
How to Do a Pull-Up: A Progressive Plan From Zero to Your First Rep
This article is for general educational purposes only and does not constitute medical or professional fitness advice.
Consult a licensed healthcare provider or certified fitness professional before starting any new exercise program, especially if you have a pre-existing condition.
The pull-up is one of the most respected bodyweight exercises — and one of the most common sources of frustration for beginners who cannot yet perform a single rep.
The good news: the inability to do a pull-up is almost always a strength deficit, not a physical limitation. With the right progressive approach, most healthy adults can work toward their first unassisted pull-up within 6–12 weeks.
This guide provides a structured progression plan, technique breakdown, and common mistake corrections.
What Makes the Pull-Up So Challenging — and So Effective
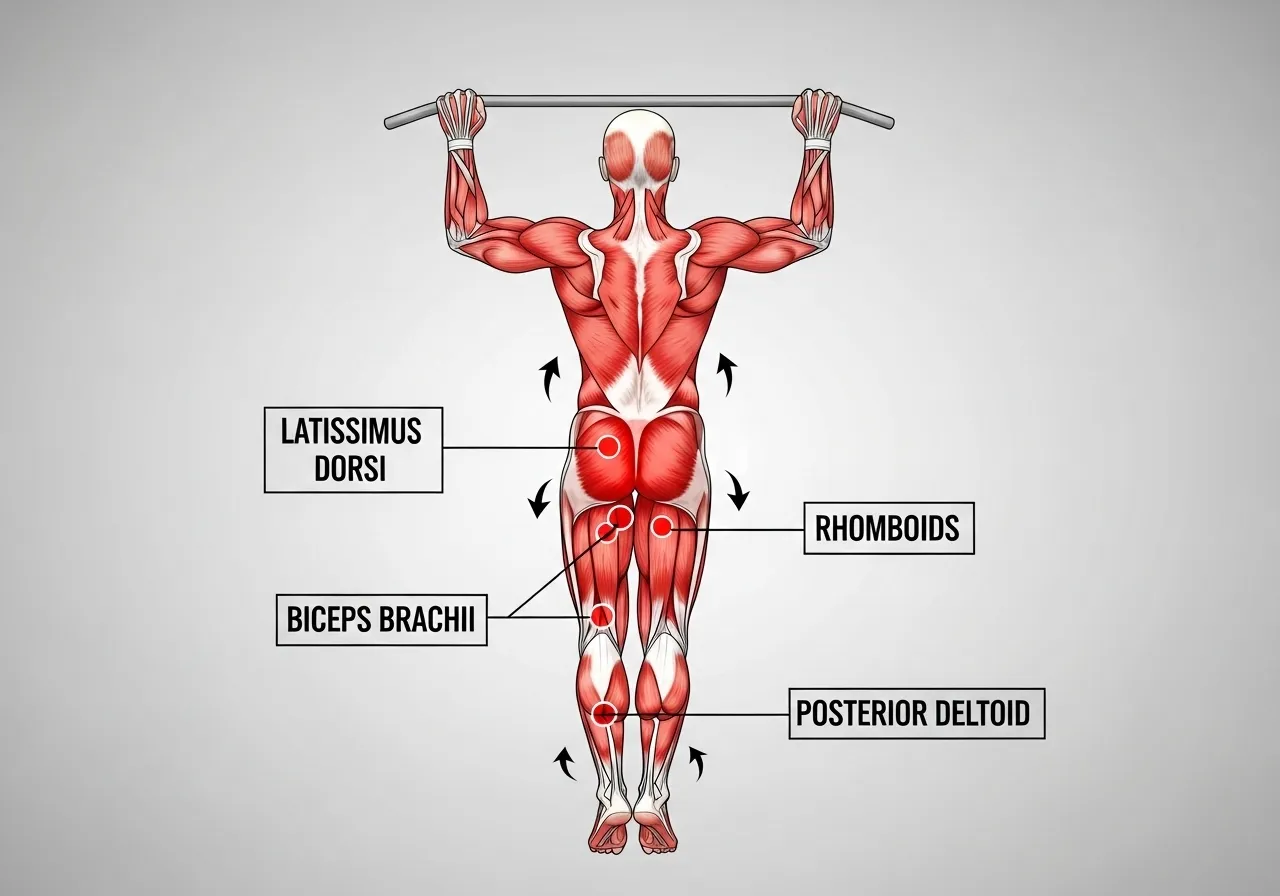
Muscles Primarily Trained
| Muscle | Location | Role |
|---|---|---|
| Latissimus Dorsi | Broad back muscle | Primary puller — shoulder adduction and extension |
| Biceps Brachii | Front of upper arm | Elbow flexion to complete the pull |
| Rhomboids & Middle Traps | Mid-back | Scapular retraction and depression |
| Posterior Deltoid | Rear shoulder | Assists shoulder extension |
| Core | Abdomen and hips | Prevents excessive swinging |
Why Pull-Ups Are Harder Than They Look
Unlike most gym machines, the pull-up requires you to lift your entire body weight through a large range of motion — with no assistance from momentum if done strictly.
For most untrained adults, the latissimus dorsi (the broad, wing-shaped back muscle responsible for most of the pulling force) is significantly underdeveloped relative to what a pull-up demands.
This is why jumping straight to attempting unassisted pull-ups is often ineffective — and why a systematic progression that builds lat, bicep, and scapular strength over weeks is generally a more productive approach.
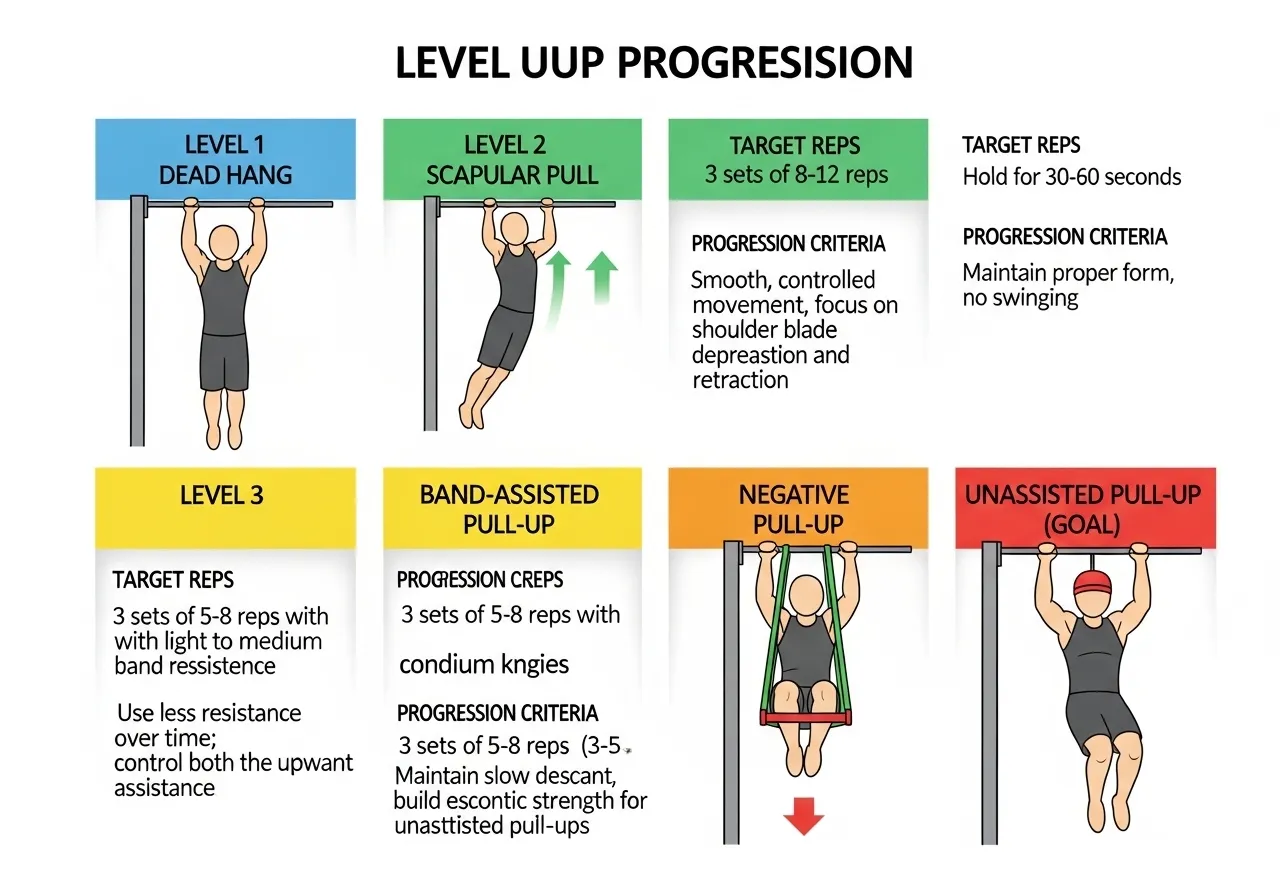
The 4-Level Pull-Up Progression Plan
Level 1 — Dead Hang + Scapular Pull
Goal: Build grip strength and scapular (shoulder blade) control — the foundation for any pulling movement
Dead hang: 3 × 15–30 sec, 3×/week
Scapular pull: Hang from the bar and pull the shoulder blades down without bending the elbows — 3 × 8
Progress when: Dead hang for 30+ sec and 3 × 10 scapular pulls feel controlled
Level 2 — Assisted Pull-Up or Band-Assisted
Goal: Train the pulling pattern with reduced load
Option A: Machine-assisted pull-up — set assistance to ~50–60% of bodyweight, 3 × 8–10
Option B: Resistance band looped over bar — kneel on band, 3 × 8–10
Progression: Reduce assistance by ~5 kg or use a lighter band every 2 weeks
Progress when: Completing 3 × 10 with minimal assistance
Level 3 — Negative Pull-Ups (Eccentric Focus)
Goal: Build strength through the full range using body weight
Method: Jump or step to the top position (chin over bar), then lower yourself as slowly as possible — target 5–8 seconds
Sets/Reps: 3 × 4–6 negatives, 3×/week
Progress when: 8-second controlled lowering feels manageable for 3 × 6
Level 4 — First Unassisted Pull-Up
Method: From a dead hang, depress the shoulder blades, initiate by pulling elbows toward the floor, and drive your chin to or above bar height
Initial goal: 1 clean rep with full range
Build to: 3 × 5 over 4–6 additional weeks

Pull-Up Technique: 5 Key Points for Correct Form
Point 1 — Grip Width
Shoulder-width to slightly wider is appropriate for most people.
Very wide grips significantly reduce range of motion and shift emphasis away from the lats into the teres major (a small round muscle at the outer edge of the shoulder blade) without clear benefit for most trainees.
Point 2 — Scapular Depression at the Start
Before initiating the pull, actively pull the shoulder blades down and back (scapular depression and retraction).
This “sets” the shoulder joint in a safe and mechanically advantageous position — pulling with elevated, shrugged shoulders increases impingement risk and reduces lat activation.
Point 3 — Lead With the Elbows
Think “drive elbows toward your hip pockets” rather than “pull the bar down to your chest.”
This cue activates the lats more directly and tends to reduce the tendency to over-rely on the biceps at the expense of the larger back muscles.
Point 4 — Full Range of Motion
Lower to a full dead hang at the bottom of each rep — arms fully extended.
Half-range pull-ups (stopping with elbows at 90°) train a limited portion of the movement and may develop a strength gap at the bottom of the range that limits progress toward full unassisted reps.
Point 5 — Minimize Swinging
Kipping (using a hip swing to generate momentum) is used in some fitness contexts but reduces the strength-building stimulus of the movement and may increase shoulder stress for those not specifically training it.
For strength development purposes, keeping the body as still as possible throughout the rep is generally recommended.
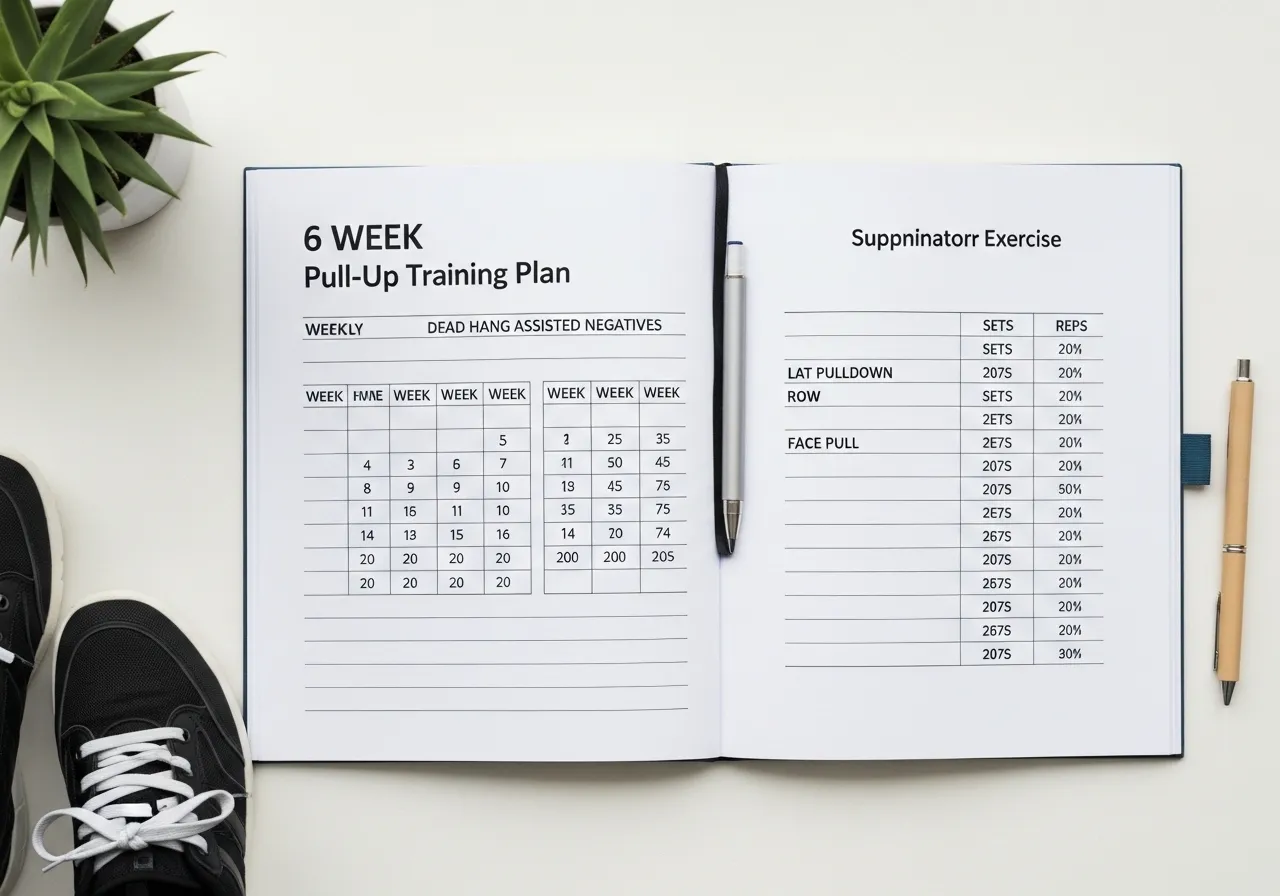
6-Week Starter Training Plan
Schedule
3 sessions per week with at least one rest day between sessions. Pull-up work can be included as part of a broader upper body session.
Weeks 1–2 (Level 1–2):
Dead hang 3 × 20 sec → Scapular pulls 3 × 8 → Assisted pull-up 3 × 8 @ 50–60% assistance
Weeks 3–4 (Level 2–3):
Assisted pull-up 3 × 10 @ 30–40% assistance → Negative pull-up 3 × 4 @ 5-second lowering
Weeks 5–6 (Level 3–4):
Negative pull-up 3 × 5 @ 8-second lowering → Attempt 1–3 unassisted reps → Finish with band-assisted to complete volume
Supplementary Exercises That Accelerate Progress
| Exercise | Why It Helps | Sets × Reps |
|---|---|---|
| Lat pulldown | Trains the same movement pattern with adjustable load | 3 × 10–12 |
| Dumbbell row | Builds lat and mid-back thickness | 3 × 10 each |
| Face pull | Develops rear delts and scapular stabilizers | 3 × 15 |
| Bicep curl | Strengthens elbow flexors that assist the pull | 3 × 12 |

Frequently Asked Questions About Pull-Ups
Q: How long does it take to do a first pull-up?
For most previously untrained adults following a consistent progressive plan, 6–12 weeks is a commonly observed timeline to the first unassisted rep.
Individual variation is significant — factors including starting strength, body weight, training frequency, and recovery quality all affect the timeline. Some people achieve it in 4 weeks; others take 16 or more. Consistent progressive training is more predictive of success than any timeline estimate.
Q: Is there a difference between pull-ups and chin-ups?
Yes — grip orientation differs:
- Pull-up: Overhand grip (palms facing away) — greater lat emphasis
- Chin-up: Underhand grip (palms facing toward you) — greater bicep contribution, often slightly easier for beginners
Both are effective. Beginners who find pull-ups very difficult may find that starting with chin-ups and transitioning to pull-ups as strength develops is a practical approach.
Q: I can do 10 assisted pull-ups but can’t do one unassisted — why?
This often indicates that the assistance level is providing more support than it appears — or that the movement pattern under full load requires neural adaptation beyond what assisted training has developed.
Prioritizing negative pull-ups (eccentric loading at full body weight) tends to bridge this gap more effectively than increasing assisted pull-up volume.
- Most healthy adults can work toward their first pull-up in 6–12 weeks with consistent progressive training
- The 4-level progression (dead hang → assisted → negatives → unassisted) provides a structured path
- Scapular depression before pulling and full range of motion are two of the highest-impact technique points
- Negative pull-ups are often the most effective bridge from assisted to unassisted
- Consult a fitness professional if you experience shoulder or elbow pain during any pulling variation